Crunchy Refrigerator Dill Pickles: 4 Quick Steps to Amazing Flavor
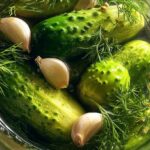
Learn how to make crunchy refrigerator dill pickles with this simple, no-canning-required recipe. Perfect for using up extra cucumbers, you’ll have tangy, crisp pickles ready to enjoy overnight.
- Prep Time: 20 minutes
- Cook Time: 10 minutes
- Total Time: 24 hours 30 minutes
- Yield: 6-8 cups
- Category: Pickles
- Method: Refrigerator Pickling
- Cuisine: American
- Diet: Vegetarian
Ingredients
Scale
- 3 pounds pickling cucumbers (about 6-8 medium)
- 1 gallon water
- 1 cup white vinegar
- 3 tablespoons kosher salt
- 1 tablespoon mustard seeds
- 1 teaspoon dill seeds
- 1 teaspoon peppercorns
- 1 teaspoon red pepper flakes (optional)
- 4-6 fresh dill heads or 2 tablespoons dried dill
- 4-6 cloves garlic, smashed
Instructions
- Wash cucumbers and trim off the blossom end.
- In a large pot or Dutch oven, combine water, white vinegar, and kosher salt. Bring to a boil, stirring until salt dissolves.
- Remove from heat and let the brine cool slightly.
- While the brine cools, prepare your jars. You can use mason jars or any clean, airtight containers.
- Pack the jars tightly with cucumbers. Add dill heads or dried dill, smashed garlic cloves, mustard seeds, dill seeds, peppercorns, and red pepper flakes (if using) to each jar.
- Pour the slightly cooled brine over the cucumbers, ensuring they are completely submerged. Leave about 1/2 inch of headspace at the top of each jar.
- Seal the jars tightly with lids.
- Let the pickles cool to room temperature, then refrigerate.
- Wait at least 24 hours before enjoying your crunchy refrigerator dill pickles.
Notes
- For extra crunch, you can add a grape leaf or a piece of horseradish leaf to each jar.
- Adjust the amount of garlic, dill, and spices to your preference.
- These pickles will last for several weeks in the refrigerator.
Nutrition
- Serving Size: 1/4 cup
- Calories: 15
- Sugar: 1g
- Sodium: 300mg
- Fat: 0g
- Saturated Fat: 0g
- Unsaturated Fat: 0g
- Trans Fat: 0g
- Carbohydrates: 3g
- Fiber: 1g
- Protein: 0g
- Cholesterol: 0mg
Find it online: https://savoryskies.com/crunchy-refrigerator-dill-pickles/
