

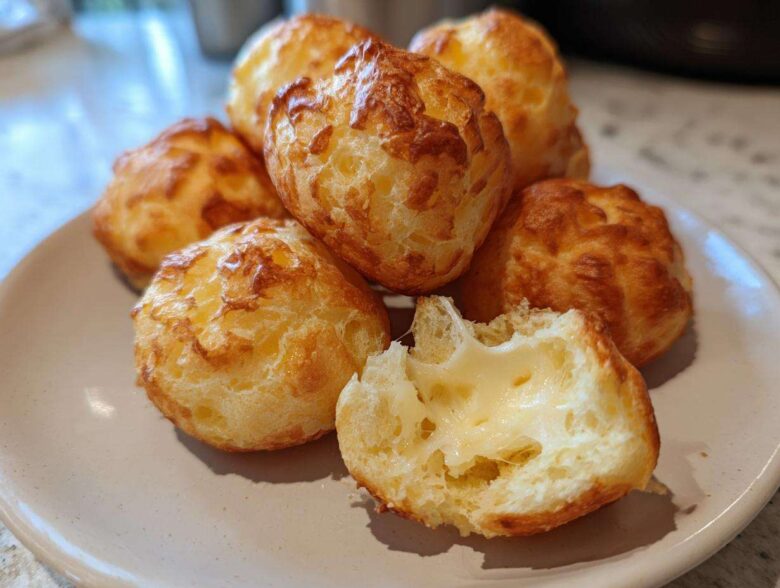
Oh my goodness, are you ready for a little bite of heaven? Seriously, there is nothing that compares to biting into homemade Brazilian cheese bread. It’s that perfect contradiction—a shatteringly crisp little shell that gives way to an impossibly soft, chewy, and gloriously cheesy center. It’s addictive, I’m telling you! Forget complicated recipes; I’m sharing my absolute favorite, super easy Pão de Queijo recipe. The best part? Because we use tapioca flour, these little puffs are naturally gluten-free! I’ve tried a million variations, but this one nailed those classic Brazilian breakfast ideas every single time. You are going to flip for these! Check out my other breakfast favorites!
Why This Authentic brazilian cheese bread Recipe Works So Well
Look, I know there are a million recipes out there for Pao de Queijo recipe, but this one delivers that signature texture every single time. We’re talking about that famous contrast: a golden, crispy shell that just cracks when you bite it, leading straight into the softest, most wonderfully elastic center you’ve ever imagined. That’s the marker of a successful batch, right there!

This is why so many people call this the best Brazilian cheese bread recipe. It truly honors the traditional preparation methods, which ensures we get that authentic, perfect elastic center cheese bread quality without any fussy steps. Trust me, once you nail this technique, you won’t look back!
The Magic of Tapioca Flour bread
The secret weapon here, the thing that separates this from regular bread, is the tapioca flour—or polvilho, if you want to sound authentic! This naturally derived starch is what gives the dough its incredible stretch. Because it’s pure starch, it creates that signature chewiness when baked. This reliance on tapioca is exactly what makes this the perfect Gluten free cheese bread. There’s no wheat in sight, which I love!
Achieving the Perfect brazilian cheese bread Texture
The second major trick to getting those beautiful, chewy results is how we handle the flour. We have to “scald” the starch by pouring the boiling hot milk and oil mixture right over it. This step is non-negotiable; it sets up the gluten-free structure perfectly!
After that, you need good cheese! Don’t skimp here. A blend is always best for those amazing chewy cheesy bread bites. The fat and salt in the cheese help the dough set up beautifully. If you skip the scalding, you just end up with heavy, dense lumps instead of those light, airy puffs. Don’t miss that hot liquid step!

If you’re looking for more tips and tricks on my baking adventures, you should check out my general baking blog—I share everything I learn!
Ingredients for Homemade brazilian cheese bread
Okay, listing ingredients sounds boring, but these are the exact things you need to gather for about 20 perfect little rolls! This recipe is so fast, clocking in at only 15 minutes of prep time before it goes into the oven. Don’p worry that the dough looks weird—it’s supposed to be sticky! That’s just the nature of the glorious tapioca flour.
Here is exactly what you need for your batch of brazilian cheese bread to come out looking and tasting authentic. Don’t even think about swapping out the tapioca flour; that’s our secret weapon! I hope this helps you make my favorite alternative cheesy bread recipes, too!
- 1 cup whole milk
- 1/2 cup vegetable oil
- 1 teaspoon salt (Don’t skip this, it brightens everything up!)
- 2 cups tapioca flour (You can use sour or sweet, whatever you have on hand.)
- 2 large eggs
- 1 cup shredded cheese (I use a mix of Parmesan and Mozzarella, but a true Brazilian blend is amazing if you can find it.)
We’ll bake these for about 25 minutes at 375°F (190°C). The final yield is usually about 20 small, puffy bites. Ready to see how we transform this list into magic? Let’s go!
How to Prepare brazilian cheese bread: Step-by-Step Instructions
This is where we turn those simple ingredients into something incredible! Don’t be intimidated by the process; this is actually some of the fastest quick gluten free baking you’ll ever do. Knowing exactly how to make Pao de Queijo really comes down to paying attention to temperature and timing. Follow these moves exactly, and you’ll have those perfect little puffs coming out of the oven!
Preparing the Base and Scalding the Tapioca Flour
First things first, crank that oven up to 375°F (190°C) and get your baking sheet ready. In a small pot, you’ll heat up the milk, oil, and salt until it just bubbles—boiling, not raging! Immediately pour that hot liquid straight over your tapioca flour in your big bowl. Stir it like crazy with a wooden spoon until everything is combined. It’s going to look like a lumpy, sticky mess, but that’s your clue that marvelous things are happening!
Mixing the Eggs and Cheese for Cheesy bread Puffs
Now we wait just a minute. We need that flour mixture to cool down so we don’t cook those eggs when we add them in! Once it’s warm, not hot, start adding your two eggs, one at a time. You must mix well after *each* egg until it smooths out a little more. Once the eggs are incorporated, stir in all the cheese. Yep, the dough stays sticky—that’s the texture that promises amazing cheesy bread puffs later!
Shaping and Baking Your brazilian cheese bread
You are going to need lightly greased hands for this part, trust me! Scoop out little tablespoons of dough—think balls about 1 to 1.5 inches wide. Place them an inch apart on your prepared sheet. They need room to grow! Pop them into the hot oven for about 20 to 25 minutes. You’re looking for them to puff up nicely and turn just lightly golden brown on the outside. The quicker you can try out this cheesy dip while they bake, the better!

Tips for the Best Brazilian cheese bread Success
I want your batch of Brazilian cheese bread to be absolutely legendary, so let’s look at a few tricks I learned through trial and error. Seriously, these little tips take my Pao de Queijo recipe from good to show-stopping!
First, about the cheese blend: while traditional recipes call for Minas cheese, which is hard to track down, you need a cheese with good flavor and melting points. I always mix salty Parmesan with creamy Mozzarella. That combination gives you the best flavor payoff for your effort. Don’t use pre-shredded stuff if you can help it; fresh shredded cheese incorporates way better!
What if your dough feels way too wet? It happens! Trust your instincts. If you can’t actually roll balls without making a huge mess, just mix in one extra tablespoon of tapioca flour at a time until you can handle it. This is key to getting that nice structure.
And here’s a huge time saver: freezing! You can totally scoop out spoonfuls of the uncooked dough—roll them into balls, freeze them solid on a tray, and then toss them straight into a freezer bag. When you want a snack, just toss the frozen balls right into the oven, but add about 5 to 10 extra minutes to the bake time. Perfect gluten free party food ready on demand! If you want to see another amazing dip to serve alongside these, check out my recipe for Neiman Marcus Dip!
Serving Suggestions for brazilian cheese bread
The best time to eat these little miracles is right out of the oven, when they are at their absolute peak—warm, crisp on the outside, and gloriously gooey inside. Don’t wait! While they are amazing for a quick Brazilian breakfast ideas boost, they shine as savory bites throughout the day.

Think of these as the ultimate quick cheese bread appetizer for any party. They pair beautifully with everything from coffee to wine because they aren’t overly sweet. They fit right in with other authentic Brazilian snacks!
I often serve them with dips, though honestly, they don’t need anything! If you’re making a spread for game day, these are always the first things to disappear. For contrast, try serving them with a salty ham spread or maybe even some pulled pork! If you need more appetizer inspiration for your spread—especially if you’re leaning into savory options—check out my sausage pinwheels. It’s party food heaven!
Storage and Reheating brazilian cheese bread
So, you managed to save a few? Good job, they usually disappear in five minutes flat! Once your brazilian cheese bread has cooled completely, store leftovers in an airtight container at room temperature. Honestly, they are best eaten within 24 hours, because that perfect crispness fades fast.
To bring them back to life—and you totally should—don’t even think about the microwave! That makes them gummy. Pop them back into a 350°F oven for about 5 to 8 minutes. You want that shell to crisp up again and that center to get gloriously soft. Trust me, they taste almost brand new!
Frequently Asked Questions about brazilian cheese bread
Is this brazilian cheese bread recipe truly gluten-free?
Absolutely, yes! That’s one of the best things about making authentic Pao de Queijo. Since we use 100% tapioca flour instead of wheat, this is a fantastic, naturally gluten-free item. So, if you’re looking for wonderful Pao de Queijo without gluten, you’ve found your winner right here! It’s safe, delicious, and totally worry-free.
Can I use different types of cheese in this Pao de Queijo recipe?
You definitely can! The traditional Minas cheese is hard to find stateside, but that’s okay. You want cheeses that melt well but also bring some flavor. I love using Parmesan because it adds that salty bite that makes the brazilian cheese bread pop. Mozzarella gives you the melt, and Parmesan gives you the flavor! Experimenting with cheese is part of the fun of making savory gluten free snacks!
My brazilian cheese bread balls are flat, what went wrong?
Oh, the flat tragedy! Don’t despair, this usually comes down to one of two things. If your oven temperature wasn’t hot enough, the structure never set before they deflated. Make sure you let the oven preheat completely! Another common issue is having dough that was simply too wet—maybe you added too much liquid, or even just too large of an egg. If it feels soupier than sticky, add just a tiny bit more tapioca flour next time!
If you’re looking for more easy recipes that are surprisingly easy to get right, you should take a peek at my Caprese Panini—it’s cafe quality in minutes!
Nutritional Estimates for brazilian cheese bread
Now, listen, nobody is making brazilian cheese bread because they are worried about calories—we’re here for the texture! But just so you know what you’re snacking on, here are the ballpark figures for about two rolls. Remember, since we’re using different types of cheese and oil brands, these numbers are just estimates, but they give you a good idea!
- Serving Size: 2 rolls
- Calories: 150
- Fat: 8g
- Carbohydrates: 17g
- Protein: 5g
It’s a fantastic little burst of energy for a quick snack or a perfect addition to your Brazilian breakfast ideas. Enjoy this cheesy goodness—the nutrition facts are just not the main event here!
Share Your brazilian cheese bread Experience
That’s it! We’ve made magic in the oven, and now it’s your turn to spread the cheesy joy! I truly hope you loved watching your dough puff up into these gorgeous, chewy orbs of deliciousness. I feel like I know you just by knowing you love authentic Brazilian cheese bread as much as I do!
Now, I really, *really* want to know how your batch turned out. Did you use a Parmesan/Mozzarella blend, or did you manage to find some specialty cheese? Drop a comment below and tell me all about it! Rate the recipe so others know this is the real deal for amazing Pao de Queijo.
And please, if you snap a photo of your perfectly puffed, cheesy bites, tag me on social media! I love seeing these chewy cheesy bread bites popping up in kitchens everywhere. Speaking of other snacks everyone seems to love, if you’re hosting a crowd soon, you absolutely *have* to check out my creamy white chicken enchiladas—they are always a massive hit!
Happy baking, and enjoy every single moment of tearing into those warm, gooey centers!
PrintAuthentic Pão de Queijo (Brazilian Cheese Bread)

Make classic Brazilian cheese bread, Pão de Queijo, using tapioca flour for a naturally gluten-free treat with a crispy outside and chewy center.
- Prep Time: 15 min
- Cook Time: 25 min
- Total Time: 40 min
- Yield: About 20 small rolls
- Category: Snack
- Method: Baking
- Cuisine: Brazilian
- Diet: Gluten Free
Ingredients
- 1 cup whole milk
- 1/2 cup vegetable oil
- 1 teaspoon salt
- 2 cups tapioca flour (sour or sweet)
- 2 large eggs
- 1 cup shredded cheese (Parmesan, Mozzarella, or Minas cheese blend)
Instructions
- Preheat your oven to 375 degrees Fahrenheit (190 degrees Celsius). Lightly grease a baking sheet or line it with parchment paper.
- Combine the milk, oil, and salt in a small saucepan. Heat this mixture over medium heat until it just begins to boil. Remove from heat immediately.
- Place the tapioca flour in a large mixing bowl. Pour the hot milk mixture over the flour. Stir well with a wooden spoon until a thick, sticky dough forms. Let this mixture cool for about 10 minutes.
- Add the eggs, one at a time, mixing thoroughly after each addition until the dough is smooth.
- Stir in the shredded cheese until it is evenly distributed throughout the dough. The dough will be sticky.
- Scoop tablespoon-sized portions of the dough and roll them into small balls, about 1 to 1.5 inches in diameter. Place the balls on the prepared baking sheet, leaving about 1 inch between them.
- Bake for 20 to 25 minutes, or until the cheese bread puffs up and the exterior is lightly golden brown.
- Serve warm for the best texture.
Notes
- For the best texture, use a blend of cheeses. Traditional recipes use Minas cheese, but a mix of Parmesan and Mozzarella works well.
- If your dough is too wet to roll, add one tablespoon more of tapioca flour at a time until manageable.
- You can freeze the unbaked dough balls. Place them on a tray in the freezer until solid, then transfer them to a freezer bag. Bake directly from frozen, adding 5 to 10 minutes to the baking time.
Nutrition
- Serving Size: 2 rolls
- Calories: 150
- Sugar: 1
- Sodium: 200
- Fat: 8
- Saturated Fat: 4
- Unsaturated Fat: 4
- Trans Fat: 0
- Carbohydrates: 17
- Fiber: 0
- Protein: 5
- Cholesterol: 35
