

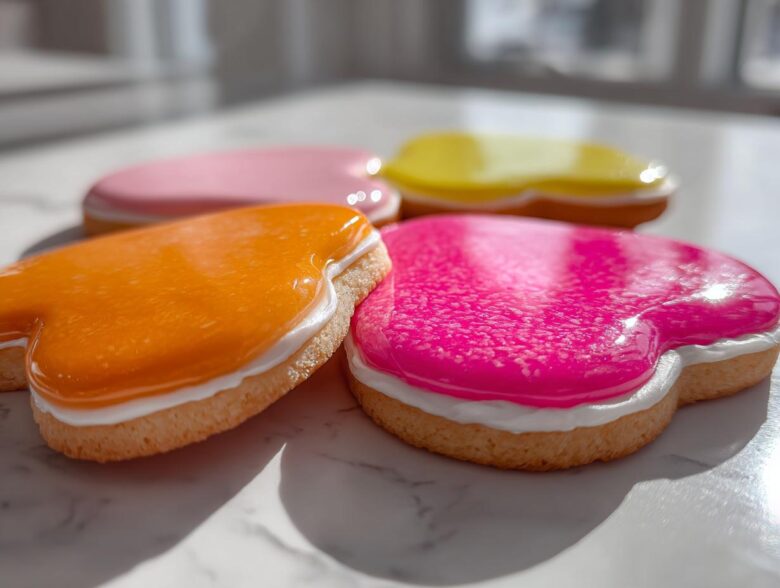
Ugh, the worst feeling, right? You spend hours getting those sugar cookies cut perfectly, baked evenly, and then you ice them and have to leave them out for what feels like three years just to dry! And if you try to stack them or put them in a tin for a holiday party? Disaster! They smudge, they bleed colors together, and your beautiful design looks like a sad, melted watercolor painting. Trust me, I’ve been there. That’s why I finally perfected this definitive, foolproof sugar cookie icing recipe. This isn’t some runny glaze; this is the stuff that dries hard, looks super glossy when it sets, and makes your cookies ready for gifting or stacking in just a few hours. Last Christmas, I made dozens of intricate wreaths, and because this icing was rock solid the next morning, I could fit twice as many boxes under the tree! It just works, every single time.
You absolutely have to give this official sugar cookie icing recipe a try for your next baking session.

Why This Sugar Cookie Icing Recipe is the Best for Decorating
When you need icing that acts like armor for your cookies, this is it! My favorite part about this specific sugar cookie icing recipe is that it achieves that professional finish without any fuss. I’m talking about icing that dries completely hard—you can stack these cookies high for gifting, and the prettiest design on top won’t budge an inch. Plus, it develops this beautiful, almost porcelain-like gloss as it cures, which really makes the colors pop.
The secret weapon here, truly, is the meringue powder. It gives us that reliable structure we need for outlining and flooding, something plain powdered sugar just can’t manage. It’s what turns simple ingredients into a durable, glossy coating. Honestly, once you switch to using meringue powder, you’ll never look back for making cookie decorating icing that holds up. For more durable frosting ideas, especially for gingerbread, check out my tips on sturdy royal icing.
Ingredients for the Ultimate Hard-Setting Sugar Cookie Icing Recipe
Okay, let’s talk about what goes into this powerhouse icing. Unlike some runny glazes that just slide off, these ingredients combine to create something structured, smooth, and ready to dry hard. Clarity here is everything, so make sure you measure accurately! I learned the hard way that eyeballing the powdered sugar leads to weeping later—don’t do that!
- 4 cups powdered sugar, sifted
- 1/2 cup meringue powder
- 1/2 cup warm water
- 1 teaspoon vanilla extract
- 1/4 teaspoon almond extract (optional)
You can find meringue powder nowadays in most big craft stores or baking supply aisles. It’s the magic binder that gives us that professional, durable finish. If you’re looking for my super simple three-ingredient icing, that one is great for simple drizzle, but you absolutely need the meringue powder for hard-setting jobs like this!
Ingredient Notes and Substitutions for Your Sugar Cookie Icing Recipe
Good news! This particular **sugar cookie icing recipe** is naturally an icing without corn syrup, so we skip that hurdle! If you’ve run out of meringue powder or just don’t want to buy it, you *can* substitute it with two fresh, large egg whites. Just know that the meringue powder is much easier for beginner cookie icing projects because you don’t have to worry about raw egg handling or freshness. Meringue powder just guarantees the consistency is right every time, and honestly, I prefer it for reliability.
Step-by-Step Instructions for Easy Sugar Cookie Icing
Alright, buckle up, because this mixing part is fast but crucial for our **easy sugar cookie icing** to turn into that hard-setting beauty we want. Grab your electric mixer—handheld works, but a stand mixer makes this part much less messy! First, gently whisk the dry stuff—the sifted sugar and meringue powder—together in your bowl so you don’t end up with lumps waiting to ambush your mixer.
Next, pour in the warm water and your flavor extracts. Start the mixer on low speed! Trust me, if you start high, you’ll have a cloud of white sugar dust coating your entire kitchen, and nobody needs that mess. Once it looks combined, crank that speed up to medium-high. You have to beat this vigorously for a full five to seven minutes. This long beating time is non-negotiable; it whips in the air needed for that ultimate smoothness and volume. When it’s done, it should look thick, bright white, and hold its shape perfectly.

Achieving Perfect Outline Consistency
That stiff consistency we just beat the heck out of? That’s your outline icing! When you lift the whisk beater, the icing that drips off should form a little peak that stands straight up and doesn’t droop for a second. Think of it like thick toothpaste standing proudly on the beater—that’s stiff enough to pipe a nice, clean dam around the edge of your cookie. This locks the flood icing in!
Thinning for Flood Consistency: The 10-Second Rule
Now for the flooding mixture, which needs to be runnier so it spreads out beautifully. Take the portion of stiff icing you plan to use next and slowly start adding warm water, one tiny teaspoon at a time. Mix it slightly after each addition. You’re looking for the perfect flow. How do you know when it’s ready? Here’s the expert trick: Drizzle some icing over the top of the bowl. If the trail it leaves sinks back into the main batch and disappears completely in about ten seconds, you’ve hit the sweet spot! If it disappears instantly, it’s too thin. If the line is still clearly visible after ten seconds, add another drop of water.
Once you’ve got your colors mixed in, you are ready to practice your cookie decorating icing application!
Mastering Cookie Decorating Icing Application
Now that you have your lovely thick outline icing and your perfectly runnable flood consistency, it’s time to make those cookies look amazing! This is where most beginners get messy, but you won’t, because we’re using the professional two-step method. First, grab the stiff icing you made—this is your dam builder. Pipe the border around the entire edge of your cookie. This border needs to be thick enough that it won’t collapse when the thinner icing touches it.
The most important part of this whole process is patience! Once you’ve outlined the cookie, walk away! Seriously, go do the dishes or answer a few emails. You need to let that outer dam set up for at least 15 to 30 minutes. If you try to flood too quickly, the thin icing just pushes right through the fresh, soft border, and you get ugly color bleeding. Nobody wins that battle. Once the outline feels firm to the touch, you can switch to your flood icing and carefully fill in the middle section. This technique is the secret behind nearly all the beautiful, clean designs you see out there! If you need a full visual walkthrough on the process, I go into more detail on how to decorate sugar cookies.

Tips for a Smooth Cookie Frosting Finish
Once you’ve flooded your cookie, you might see pesky little air bubbles pop up—those are guaranteed to leave dents when the icing dries, and nobody wants a pock-marked cookie! As soon as you finish flooding an entire tray, gently pick up one cookie and tap it firmly against the counter surface. Give it a few good taps! You will literally see the bubbles rush to the surface and pop. It’s so satisfying! This little action guarantees you get that super smooth cookie frosting finish we are aiming for, making your whole batch look incredibly professional without any extra effort.
Drying Time and Stacking: Making Your Icing That Hardens
This is where my patience gets tested every single time I make these cookies! You’ve done all the decorating work—the careful outlining, the perfect flooding, the air bubble popping—and now you just want to admire them and put them in a box. But you can’t rush perfection, especially when you want that gorgeous durability this frosting promises.
You must let these cookies dry for a minimum of six hours, but honestly, if you can wait a full twelve hours, you’ll have the most resilient icing ever. This drying time is vital because it allows the meringue powder and sugar structure to cure fully. This isn’t some creamy, soft frosting meant to melt in your mouth immediately; this is your reliable, icing that hardens beautifully.
If you try to move these cookies around after only three hours—especially if your kitchen is humid—you risk fingerprints, smudges, or, worse, the entire flood layer sliding off as you try to stack them. Since this is specifically formulated to be a hard setting cookie frosting, giving it the full time it needs ensures your hard work stays looking pristine. If you’re in a real hurry, you can place them near a dehumidifier or a very low, not warm (use caution!), fan just to speed things along, but I always recommend setting them out overnight if possible. For more information on how I ensure a rock-solid finish, check out my notes on sugar cookie icing that hardens.
Troubleshooting Common Issues with Your Glossy Cookie Glaze
Even with the best sugar cookie icing recipe, sometimes things go a little sideways, right? Baking is chemistry, and humidity is my archnemesis! But don’t panic if you see a little imperfection on your beautiful, otherwise glossy cookie glaze; usually, the fix is super simple if you catch it early.
The most common heartbreak for me used to be cracking. You wait all night, everything looks perfect, and then you touch it, and boom—a network of tiny cracks appears. Nine times out of ten, that means you didn’t beat enough air into the icing when you first mixed it, or maybe you added the flood icing too quickly before the outline set. If you see small cracks developing while it’s still wet, try smoothing them over gently with a damp fingertip—but only if the icing is still pliable.
Weeping is another big headache, where little beads of moisture form on the surface, making that gorgeous gloss look dull. This is almost always a liquid issue. If your icing is weeping, it means you added just a touch too much water during the thinning-down process for flooding. For thinner icing, if it weeps, you need to add a tablespoon of sifted powdered sugar at a time until it firms up just a little bit. It’s a delicate balance, but you’ll get the hang of it!
If your cookie decorating icing just seems totally limp and won’t dry, check your meringue powder amount. Did you accidentally use regular powdered sugar without adding egg white powder? If so, it will never truly set hard. For next time, make sure you hit that 1/2 cup measurement exactly. If it’s still soft the next day, you can try gently running a hairdryer over the cookies from a distance, but honestly, for a batch that won’t set, I usually just call it a beautiful soft frosting and serve those first!
Storing Leftover Simple Powdered Sugar Icing
Oh, the dreaded leftover icing dilemma! I always seem to mix up way too much, or I get worried and make an extra batch just in case, and suddenly I have half a bowl of beautiful, stiff icing staring back at me. Don’t throw it out! This isn’t like buttercream that needs the fridge fussiness; this simple powdered sugar icing lasts wonderfully at room temperature, which I love.
The number one rule for storage is air tightness. You have to seal it up! If any air gets to it, it starts forming that awful hard shell on top, and you lose all that smooth texture we worked so hard to create. Scoop any leftover icing—both the stiff outline stuff and the thinned-out flood icing—into an airtight container. I use small, sturdy plastic Tupperware containers with tight-fitting lids. Wrap the tops of the containers with plastic wrap before sealing the lid, just for extra insurance!
Pop that container right in your pantry or on a cool shelf. This icing is perfectly happy at room temperature for up to three full days. When you go to use it again the next day—say, to decorate cookies for an impromptu bake sale—it might look a little dense or stiff after sitting overnight. Don’t panic and don’t add more liquid right away! That’s normal.
Before you use it, just give it a really enthusiastic stir with a spoon or a rubber spatula. It should loosen right back up and regain its beautiful consistency. If you’re using flood icing that seems a bit stiff, just stir in a half-teaspoon of water at a time until it flows nicely. If your outline icing seems too soft, add a tiny sprinkle of sifted powdered sugar on top and stir it in well! It’s so reliable, which is just one more reason I adore this recipe for any holiday project.

Frequently Asked Questions About Beginner Cookie Icing
It makes sense that people have questions when they are first tackling hard-setting royal icing. It seems intimidating, but once you nail this specific sugar cookie icing recipe, you’ll feel like a total pro! Here are the things I get asked most often about working with this reliable icing for the first time. I even included a link to my favorite sugar cookie base recipe if you need something sturdy to put this beautiful icing on!
Can I use regular milk instead of water in this sugar cookie icing recipe?
That’s a great question! You totally *can* substitute milk for the required warm water, especially if you want to use traditional vanilla extract instead of almond—it adds a lovely richness. However, I always recommend sticking to water when you need that hard, glossy finish. Milk contains fat, which can sometimes slow down the drying and hardening process just enough so that your icing stays a little softer than we want. For the most durable, glossy cookie glaze that sets up fast, water is your friend!
How do I get the icing perfectly smooth for detailed cookie decorating icing?
Smoothness is all about preparation and power! First, you absolutely must sift your powdered sugar. Even if the bag says it’s pre-sifted, I hit it with the fine-mesh sieve anyway to make sure—lumps are the enemy of smooth icing. Second, and this is huge, you have to beat it on medium-high speed for the full five to seven minutes we talked about. Don’t stop at four minutes just because it looks okay! That extra beating time is what removes tiny air bubbles trapped in the sugar and dissolves the meringue powder completely, resulting in that professional, super-smooth texture.
How far ahead can I make this icing?
You’re talking to the right person because I always over-prepare! You can mix up a big batch of the stiff icing consistency and keep it sealed up airtight at room temperature for about three days. Remember, when you go to use it later, just stir it really well. If it seems stiff, give it a tiny bit of water until it’s perfect again. I wouldn’t recommend mixing the flood consistency until you are ready to start decorating, just because thinning it down is precise, and you don’t want to mess with that 10-second rule mid-process!
What kind of food coloring should I use?
Please, please, please only use gel food coloring for this icing! Liquid food coloring you buy in the grocery store is mostly water, and if you add too much of it to this already precise recipe, you will turn your stiff icing into runny flood icing instantly! Gel colors are super concentrated, meaning you only need the very tip of a toothpick dipped in color to get vibrant shades without altering the texture of your hard setting cookie frosting at all. It makes coloring so much easier!
Estimated Nutritional Data for This Icing
Okay, I know the real reason we’re making cookies isn’t for the spreadsheets, but sometimes folks ask about the nutrition facts. Since this icing is basically pure sugar power with a little meringue lift, the numbers aren’t exactly shocking, haha! But here is what my estimations look like for a standard serving size.
Remember, these numbers are guesstimates based on the recipe quantities and typical ingredient brands. If you use different vanilla or sugar brands, the final values will shift a tiny bit, so treat this as guidance rather than gospel!
- Serving Size: 1/4 cup mixed icing
- Calories: Around 180
- Fat: Practically zero—0g!
- Protein: About 2 grams
- Carbohydrates: 45 grams
- Sugar: 45 grams
See? It’s definitely a treat! It’s pure energy designed to make your holiday cookies look amazing. Since this **glossy cookie glaze** is purely topping and doesn’t have any oils or butter added, it stays delightfully fat-free. That’s the power of powdered sugar and meringue powder working together! Don’t forget, if you need a refresher on how to make the icing thick enough to be durable, just jump back up to the mixing instructions!
PrintHard-Setting Glossy Sugar Cookie Icing

This recipe makes a simple powdered sugar icing that dries hard and glossy, perfect for decorating and stacking sugar cookies.
- Prep Time: 10 min
- Cook Time: 0 min
- Total Time: 10 min
- Yield: Covers approximately 3 dozen standard cookies
- Category: Dessert Topping
- Method: Mixing
- Cuisine: American
- Diet: Vegetarian
Ingredients
- 4 cups powdered sugar, sifted
- 1/2 cup meringue powder
- 1/2 cup warm water
- 1 teaspoon vanilla extract
- 1/4 teaspoon almond extract (optional)
Instructions
- In a large bowl, whisk together the sifted powdered sugar and meringue powder.
- Add the warm water and extracts to the dry ingredients.
- Beat with an electric mixer on low speed until combined, then increase speed to medium-high.
- Beat for 5 to 7 minutes until the icing is very smooth and holds stiff peaks. This is the base consistency for outlining.
- To create flood consistency, take out the amount you need for flooding and mix in water, 1 teaspoon at a time, until the icing slowly drizzles off a spoon and the trail disappears into the bowl after about 10 seconds.
- Divide the icing into bowls and add gel food coloring as desired.
- Use the stiff consistency icing to outline your cookies. Let the outline set for 15 to 30 minutes.
- Flood the outlined areas with the thinner icing. Gently tap the cookie on the counter to release air bubbles.
- Allow the icing to dry completely, usually 6 to 12 hours, before stacking or handling the cookies.
Notes
- For a stiffer icing that dries faster, reduce the water slightly.
- If the icing is too thick, add water 1/2 teaspoon at a time. If it is too thin, add sifted powdered sugar 1 tablespoon at a time.
- Store unused icing in an airtight container at room temperature for up to 3 days; stir well before using again.
Nutrition
- Serving Size: 1/4 cup mixed icing
- Calories: 180
- Sugar: 45
- Sodium: 5
- Fat: 0
- Saturated Fat: 0
- Unsaturated Fat: 0
- Trans Fat: 0
- Carbohydrates: 45
- Fiber: 0
- Protein: 2
- Cholesterol: 0
